Wednesday, February 20, 2013

rowing along....

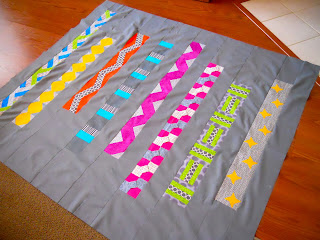
 It's been a while since I updated you on my row quilt progress.
 Today I put my last row on the front. My quilt top ended up being about 60x70 inches.
The last row I added is the star row on top of the next photo. I made the stars following Lori Holt's (Bee in my Bonnet) instructions for her row along. But then I added sashing to the edges and changed my look a bit. Here are four of my rows...
 And the other four.
 Two more rows will be included on the back of my quilt, beginning with this.....
This has been really fun to do and I can't wait to finish it up. Also, I am anxious to see everyone else's row quilts completed. It's been fun watching their progress. They are all so different! There are going to be some beautiful quilts and I promise to show you all of them when they are done.

I hope you're having a fun crafty day too!

Thursday, February 14, 2013

patchwork scarf tutorial

Remember the fun scarf I made myself a while back? I promised you a tutorial. And no, I didn't forget. I made this version so I could teach you step by step....


 First off, gather your fabric for the patchwork side. For this scarf I used 16 4 1/2 inch squares. This makes a scarf about 64 inches long.... nice and long! If you want yours shorter or longer you can subtract or add squares. It's totally up to you. Just for fun, I made a couple of my squares out of 4 different 2 1/2 inch squares....


Now sew your squares together, end to end, in an arrangement that is pleasing to you. Use 1/4 inch seams....


You will need a piece of flannel for the backing that is exactly the same size as your finished patchwork. One width of fabric won't be long enough. Don't worry about it! Cut two strips and sew them end to end to get the length you need. Now lay your patchwork and your flannel right sides together....


and stitch 1/4 seam all the way around, leaving a gap (about 3 inches) for turning...


clip your corners and flip your scarf right side out. Press it well, pressing the seam allowance in the gap to the inside. Topstitch all the way around....


 Well that's pretty! you could wear it just like that if you want to. But why not fancy it up a bit more? First, using 2 strands of embroidery floss, blanket stitch all the way around your scarf. Bury your knots inside the scarf like you would if you were quilting. Make your blanket stitches about 1/4 inch apart.


Now get yourself a skein of yarn (I used wool ease, any worsted weight yarn will work just fine) and a crochet hook (I used an F hook). Loop your yarn into the top of a buttonhole stitch and single crochet all the way around, one single crochet in each buttonhole stitch. Stitch three single crochets in each corner. Join with a slip stitch when you get to the beginning.

Round 2: chain one.* skip one single crochet, do 5 double crochets in the next stitch, skip one single crochet, single crochet in the next stitch. Repeat from * all the way around creating a pretty ripple edging. Join with a slip stitch when you get all the way around. 


Look at that! you did it! I knew you could. Now wrap that fancy scarf around your neck & be warm today! Oh, and if you make one of these, please add it to my flickr group so we can all see it!

this scarf is available in my shop if you really don't want to make one yourself!

Wednesday, February 13, 2013

the endless birthday

I'm pretty sure this is my last birthday post for the year. I just had to share with you what Ally made for me. Check this out....

Ally has been painting canvases for her friends birthdays with things they love on them, quotes, names, sayings, etc. This is the one she painted for mom! I love how the background looks like a quilt and my logo is laid over the top. Wow! I can't wait to get it hung up on the wall above my sewing machine.

I'm working on a tutorial to share with you soon. Hope you're having a great week.

Saturday, February 9, 2013

more sewing lessons and fun mail

The junior high girls came to work on their quilts again today. We have so much fun when they are here....

 Two of the girls finished up their Line Dance quilt tops. The third one is almost finished too. We even got one quilt all pin basted and ready for me to quilt this week. The girls are anxious to be finished.


And I received some fun mail this week! More birthday mail from my sewing buddy, Annie. 2 pattern cards and some fat quarters. I didn't get a picture yet, but I already made one of the little wallets from the fat quarters and it's fabulous! More on that another day.

And lucky lucky me, I won a giveaway over at Prsd4tim2. Wendi had offered up the sweet Cherry on Top charm pack but when the package arrived all of these goodies were inside! Thanks Wendi! I will have fun with all of it!
Wow, what a great birthday week. I imagine the packages are done arriving now, darn!

Wednesday, February 6, 2013

crafty tuesday... the February version

There's nothing like throwing yourself a birthday party! I highly recommend it. And what could be more fun than crafting with friends all day? Not a thing. Melissa even brought balloons...
 There were so many of us we had to pull the kitchen table into the dining room. Cheryl spread her scrapbook stuff out and hogged the whole table for herself! I think she actually got some scrapping done this time....
 See poor Cheryl off in the distance in the next photo? Honestly she wasn't that far away! Kind of like the rear view mirror, items are closer than they appear! Trae was sorting embroidery floss and making it all neat and tidy. Melissa was scrapping too....
 Raquel came and joined us for the first time. No, she didn't sit and read magazines all day! She crocheted TWO of those cute ruffly scarves and learned some embroidery stitches! Joellen was english paper piecing and appliquéing.....
 I was working on english paper piecing too! Clamshells.... something new to me. I finished up the topper for my mini quilt....

While the girls were here, I opened up my package from Maria which had arrived from Australia last week (can you believe I waited???) Check out this amazing pillow cover (she would call it a cushion cover!). I am totally in love....
 This will be on the sofa in my sewing room so I can enjoy it every day. Wow! Thanks Maria! Look at the detail...
 She included these sweet goodies in the package too (as if that pillow cover wasn't enough!) A cute pattern and a lovely embroidered linen (I think I will use it as a dresser scarf. It matches my bedroom!)
 Some more goodies I received from friends (both friends here and friends far away.....
I am a lucky lucky girl. Such good friends.... I wouldn't trade them for anything!

Monday, February 4, 2013

gluten free baking...

 because seriously, if I don't bake myself a birthday cake, who will? This was my favorite cake growing up and even as an adult, it is what I would request for my birthday. A well loved recipe, can you tell? It even has high altitude adjustments written on it from when I lived in Colorado.


 Lemon Jello cake! Of course, since going gluten free more than 4 years ago I can no longer have a regular, box mix cake. I have been saying for a long time that I was going to try to make it gluten free and today I finally tried it! I have not been able to find a gluten free lemon cake mix so I bought this Pamela's vanilla cake instead. It makes a 9x13 cake, unlike most of the gluten free mixes which only make a small square cake.  I added some lemon juice to the mix instead of the vanilla they called for. Otherwise I made it exactly the way Mom's recipe said.
 And look at this! It looks fabulous..... and it smells so good. I'm having a really hard time not eating it right out of the pan for lunch.

I think we will taste test it after dinner tonight, before I spring it on my friends at crafty Tuesday tomorrow. You know, like the king's testers? Just to be sure noone dies....

And to make this day even sweeter, they had daffodils at the grocery store this morning! Maybe the groundhog was right after all. It does feel like spring here in Texas.


I'm so happy I get to share my birthday tomorrow with friends, sewing and crafting, just the way I like it! I'll let you know how the cake tastes.

Friday, February 1, 2013

ellyn's place stitchalong, February

Happy February! Have you stitched up your January mittens yet? I know some of you have, because I've seen them in our Flickr group. I'd love to see what everyone else has done. Please add your pictures to the group anytime!

It's time for February stitching. Our theme this month? You guessed it. Hearts! I played around with lots of Valentine's ideas, but in the end I thought to myself "what is the one thing we all love?" Stitching! So here it is.....
You can download the pattern here. Stitch your block in the middle of one of your 8 inch squares of fabric just like you did in January. Again, I used 2 strands of embroidery floss and mostly backstitch. I added a little bit of satin stitch for the thread on the spool, and some lazy daisy stitches for the flower petals. I'll bet some of you will have this done before today is over!

When you finish your block, press it well and trim it down to 4 1/2 inches square, just like you did with your mittens. Two blocks done! You guys are so good at this. Now upload a picture to the flickr group so we can all see! Nice job.