Showing posts with label funky dresden. Show all posts

Tuesday, April 23, 2024

Pantone Quilt Challenge, 2024

 Well, I sure didn't mean to step away from my blog for months and months, but here we are! I have no excuses really and lots to share with you so let's get to it, shall we?

My most recent quilt finish is Seasons in the Sun, my entry for the Pantone Quilt Challenge this year. In case this challenge is new to you, Pantone chooses a color of the year ever year, this year it is Peach Fuzz. Not really a favorite color of mine, but when you combine it with shades of teal and aqua anything works, right?

Finished quilt 34"x34"

Seasons in the Sun is 34" square and uses my own Funky Dresden technique. I've been revisiting this technique quite a bit lately, tweaking it and having a great time with variations. I added faced bindings and quilted it in a diamond grid with my walking foot.

Elizabeth Ray and Sarah Ruiz are heading up the challenge this year, so I have included my entry. You can see all of the entries as they are uploaded here. There are lots of great sponsors and fun prizes. Elizabeth and Sarah have made this tons of fun. Do hop over and check out their blogs and all of the fun entries.


Sunday, November 14, 2021

Funky Dresden Revisited

For the fifteenth quilt in my Through Ellyn's Eyes series, I decided to revisit and old favorite technique of mine, the funky dresden. I've made many variations of this wonky dresden over the years but never combined lots of them into one quilt like this! I must say it was great fun and I rather love the ending result.

For this quilt I used Kona Black, Corn Yellow, Chartreuse and Capri. The finished quilt is 33x44, the biggest quilt in my series so far and, for that matter, the biggest quilt I have quilted with my walking foot on my domestic machine! I quilted it in a simple diamond pattern and bound it with a big stitch on the front. I'm really loving binding wall quilts this way.
I use a size 8 pearl cotton and a chenille needle (size 22 or 24) when I big stitch. I also find the green needle threader below to be a valuable tool when working with pearl cotton. It's made by Clover and it is so sturdy! 
As usual, I couldn't resist throwing in a couple of cross stitches along the way...

So, fifteen quilts done and about six weeks to go!


Tuesday, January 12, 2021

First Finish of the New Year


Last night I put the finishing stitches on the binding of my 2021 Word of the Year quilt.  You can read my thoughts on the word believe here.  I thought a magic wand was the perfect item to represent my word this year.

All of the fabrics are Moda Grunge and the finished quilt measures 18" x 20".  I used a bunch of different techniques in this one tiny quilt.... foundation paper piecing for the letters, my own funky dresden technique for the end of the wand, needle turn appliqué recently learned from my friend Martha for the stick, big stitch quilting on the yellow, and machine quilting for the rest.... and I'm really happy with how it all came together.


Sunday, October 21, 2018

Michael Miller fabric challenge

The modern quilt guild issued another fabric challenge and I jumped on board! First of all, free fabric, duh! and second, I really enjoy challenges. We received three colors of the hash dots fabric and peach solid cotton couture, a fat eighth of each. Since it is ok to add other Michael Miller solids, I ordered some of the Marine Cotton Couture, which matched one of the hash dots we received. And, like always, it sat on my cutting table for weeks waiting for me to be inspired.

Finally, I decided to do a variation on my Funky Dresden pattern which I designed and shared here on the blog almost 2 years ago (gasp! where does the time go?).

We were told to use at least 2 of the three hash dots provided and the peach solid. The funny thing is, once I got to designing and sewing, the hash dot I left out is the Marine that matched the solid I had bought! I inserted a narrow piece of the peach into the other hash dot dresden wedges and only used the one background fabric, not two like I had in my previous Funky Dresdens.
My finished mini quilt ended up 13" square. I quilted it on my domestic Janome 6600 and left the wedges and center unquilted so they pop. 
It's fun to see what others have come up with! Check out the #mqgfabricchallenge on instagram to see more!

Friday, December 29, 2017

2017 the year of the dresden

2017 was a fun year in my studio! As usual, it took me places I didn't expect and I learned so much. If I had to name my year, it would be the year of the dresden. The year kicked off with the creation of my funky dresden....
Which evolved into a tutorial and instagram sew along (my first!) which was lots of fun....
Dresden play continued and found it's way into my Riley Blake challenge minis...
And then I came up with my spiral dresden, which is heading to New York to live...
My MQG sponsored a dresden swap, and you better believe I was all over that! Here are the dresdens I received in the swap....

And the quilt I created with them...

Whew, that's a lot of dresdens. I thought I'd be moving on to something new in 2018, and then I saw the #tinydresdenparty announced over at Quilty Obsession and I knew I'd be joining in (it starts January 3). Spoiler alert, I've already made 2 tiny dresden for the party..... here we go again!

SaveSave

Thursday, April 6, 2017

Riley Blake challenge

The spring fabric challenge for the Modern Quilt Guild is wrapping up. Finishes are not due until the 30th of April, but since mine is done, I thought I'd share it with you. I loved the Riley Blake Rockstar fabrics because of the color way. Right up my alley! Truth be told, I had sworn off these challenges because I just wasn't that thrilled with the last couple of fabric bundles. Then I saw these fabrics and totally caved in!
I decided to do a collection of minis with my fabric. I did add in Riley Blake solids in Aqua and Red. The first mini I did is the bottom right mini, a Love All Around block by Lee Monroe (May Chappell) You can read about her block and get the free tutorial here. I had been wanting to try out this block and this seemed to be the perfect time. I really love this block and will surely be making more down the road!
The finished minis are all 14" square. Next up was a mini version of my own Funky Dresden. 
And then, because I have been having so much fun with dresdens, I did two more modern dresden interpretations. First a modern dresden quarter square triangle (inspired by Season 1, episode 4 episode of Fresh Quilting)
And then I used up every last scrap of fabric on this modern dresden sunrise...
So that's my submission for the challenge! I've had so much fun watching others pop up on Instagram (#mqgfabricchallenge). You really must check out all of the submissions! Some of them are truly amazing. I had a great time creating mine.


Friday, January 27, 2017

funky dresden tutorial part two.... let's sew!

At the end of the last post, we had all of our pieces for the funky dresden cut and were ready to put them together. If you're just now joining us, hop back there for all of the cutting instructions. Today we sew!

We'll start by sewing our dresden wedges into a circle. Flip your pieced wedges over on top of the next-door solid wedges...
flip the pink ones too, like I did the white ones here...
and chain piece them together. begin at the top and sew to the bottom of each pair...
Once you have them all sewn in pairs, lay them back out in your circle. This is your last chance to move them around and change the layout! 


Happy with the way you have them? Ok, now sew your pairs into fours, fours into eights and so on, until you have a complete dresden circle...
I have to admit to you, when I got to this point in my first funky dresden quilt I searched my house for something that was a perfect 20 inch circle. I found nothing. Then I realized, all I needed to do was go back and carefully trim the little triangles that popped up at each seam, smoothing the edges. 
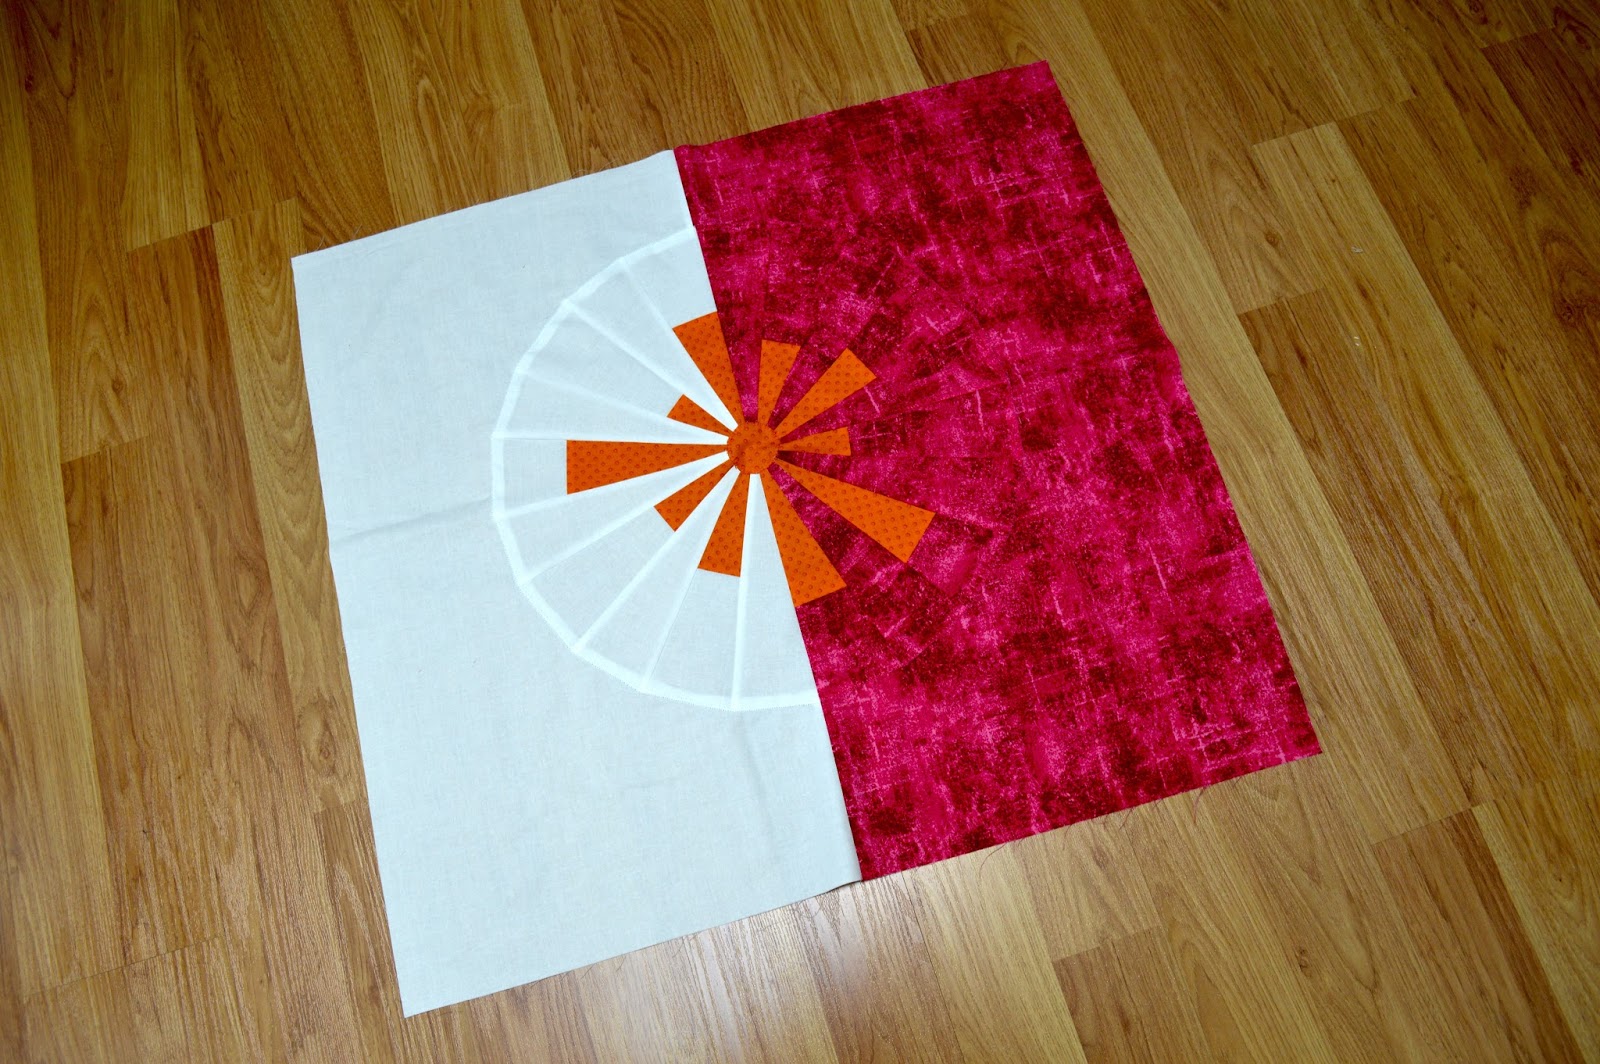
Once I smoothed them out, I was ready to appliqué it onto my background. First, join your two background pieces (the 16 1/2 x 30 inch pieces) along the 30 inch side with a 1/4 inch seam. Press the seam open. Now lay your dresden circle on top, carefully matching the top and bottom when the dark and light backgrounds come together...
At this point, applique your dresden on top however you like to appliqué. I confess, I am not an appliqué genius! I chose to pin mine down, really really well, making sure it was laying completely flat, then I raw edge machine appliqued using the buttonhole stitch on my machine.
I changed my thread color to match each background fabric...
Turn your quilt top upside down and carefully trim away the excess circle in the center, leaving a good seam allowance (mine is about 1/2 inch). Be very very careful not to cut your dresden circle. This will reduce the bulk of your quilt top.

Now we need to deal with the hole in the middle!

I auditioned lots of different center ideas. On my first funky dresden, this was the subject of debate on my instagram page. For that quilt, I ended up going with a 2 1/2 inch wonky square. This time I decided it wasn't my favorite option...
The 2 1/4 inch split circle was ok...
I even tried that one reversed, as was suggested to me on instagram. not bad...
In the end, this time I decided to go with an orange center that matched my pieced dresdens...
Again, I pinned it down really well and blanket stitched around it....

And your quilt top is done! 
Ready to quilt as you wish. I did my first one with radiating lines from the center. I really want to try spiral quilting on this one.... we'll see if I can get my nerve up!

After quilting, trim your topper to 30 inches square. On my first quilt, I trimmed the excess off of one side, leaving my circle uncentered, just the way I wanted it! I think I will do the same with this one.

Finish off with matched binding to keep the background uncluttered. Or do something different! If you decide to go with matched binding, I recommend Debbie's tutorial here. 

If you make a funky dresden quilt, I hope you'll post pictures on instagram. Tag me (ellynz) and use the hashtag #funkydresden. Have fun with it!


Thursday, January 26, 2017

Funky Dresden Tutorial part one... cutting

Thank you all for your interest in my Funky Dresden quilt! I had so much fun creating it, and it seems some of you would like to make one too. Since I didn't take any pictures of my process the first time around, I decided to make another, in completely different colors, and document as I go. Today I'll step you through the cutting process.
As I mentioned in my last post, you will need one yard each of two background fabrics, a light and a dark (here the dark pink and the white) and 1/2 yard of your contrast (orange print)
Let's cut the background fabrics first. I stacked mine on top of each other. First cut two strips from both fabrics, 2 1/2 inches wide x the width of your fabric. Set these aside for your binding....
Now even the rest of your fabric out to 30 inches. From your 30 inch pieces, cut one 16 1/2 x 30 inch piece (set aside for your background square), one nine inch strip (for solid dresden pieces) and one 7 inch strip (for your pieced dresdens). Cut these from both background pieces (you can only see my white here, but the pink is underneath).
from your contrast piece, cut two pieces, each one 6 1/2 inches by 30 inches
Now take the two pieces you just cut and the two 7 x 30 inch background pieces, join them with a 1/4 inch seam along the long edge, and press well, pressing the seam allowance toward the contrast piece.
ok, back to the cutting table. It's time to cut our dresden pieces. I used a creative grids 18 degree dresden ruler. If you have a different ruler, you  may need to adjust some measurements of the number of wedges you need. With the 18 degree ruler, you need a total of 20 wedges for a circle. 
Place one of your pieced strips right side up on your cutting mat, with the contrast piece toward the bottom. You will need 5 pieced wedges from this strip, all of them with the narrow end on the contrast. This is important! Cut your first side, as shown below
Please note... I'm a lefty! if you're right handed you'll want to start at the other end of your fabric. Cut up the side and across the top, just to the end of the ruler....
Now flip your fabric around so the cut edge is on the other end.

and cut down the other side...

as you can see, now your angle is going the wrong way to cut another wedge for your circle. No need to waste fabric straightening it out. Just go ahead and cut a wedge the other direction and set it aside for another project.

Now take your remaining fabric, and trim 3/4 to 1 inch off of the contrast edge, making it smaller.

We will be trimming 4 times to get different variations in our wedges. Since you have about 4 inches extra width to work with, be careful not to cut off too much or your last wedge will be too short.  moving on....

Take your trimmed fabric and cut your next wedge. See how it extends farther into the background fabric since you trimmed the contrast? You'll need to cut that little extra bit of the side edge too.
Then cut another upside down wedge to set aside.
Now trim a little more off your contrast side again and continue in this manner until you have five dresden wedges with the narrow edge in the contrast fabric (and five backwards wedges for another day).

Repeat this process with your other pieced strip. Here are your 10 pieced wedges...
You also need five solid wedges from each of your background colors. You can stack them up and cut them together...
Also, since these are not pieced, you can use the wedges that are cut upside down as well. No need to cut extras.

And your cutting is done. Now you can play with laying out your dresden circle. You will want all of the dark background wedges (solid and pieced) on one side of the circle and all of the light background on the other side. Alternate pieced wedges with the solid wedges. Play around with wedge placement until you have a design that makes you happy. 

I'll be back soon to start you sewing!