I'm a huge fan of Mollie over at Wild Olive. Have you checked out her blog? You must! A month or so ago she posted this tutorial for English Paper Piecing a plus quilt. Genius! She included a free pdf for the paper pieces needed. I bookmarked it for later on, knowing I wanted to give this a try. On Tuesday, which was crafty Tuesday over here, I gave it a whirl.....
Let me just say, I have gone crazy with the pluses and there are many many more finished. But that's a whole other blog post for another day. Today I want to share something else.
While I was working on these pluses, I found myself thinking "hmmmm I wonder if I could turn these into the raspberry kisses blocks that I love so much?" Here's Rachel (Wooden Spoon Quilts) original tutorial for the kiss blocks made by machine. I love this tutorial and have made several things using it! But could I EPP the same blocks? I wondered. (and I know a few of you are rolling your eyes at me right now! I SEE YOU THROUGH MY COMPUTER! humor me people!)
 |
| the pillow I made for Catherine for our MQG swap using Rachel's tutorial |
 |
| A mini I made for my sewing space also using Rachel's tutorial. |
I started with pluses made using Mollie's tutorial. I think her little templates look like houses, don't you? So from here on out, I shall refer to them as such. To make one EPP Kiss block, you need to prepare:
4 houses for the plus (for mine I used all the same fabric for these, this is the color in the center)
4 houses with the roofs cut off (or you could cut four 1 1/2" squares) in a second color (mine are light gray)
2 squares, each one 3 1/2", cut in half on the diagonal like this:
so four triangles, prepared in a third color, mine are dark gray.
You can use your favorite method to baste the fabric to your cardstock. I happen to prefer glue basting. But if you like to stitch baste yours, feel free! When you get your pieces prepared, you can lay them together to see how it will look, like this:
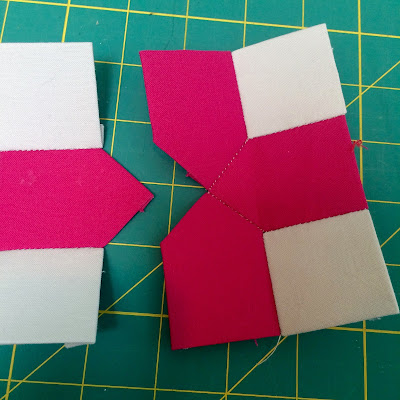
I learned a few things along the way that made stitching this together so much easier and I thought I'd share them here. To avoid piecing those squares into tight corners, Stitch two rows like this, with a square on either side of a house:
Now add your extra houses to one side....
And then stitch it all together like this...
Well now, that's a cute little block, isn't it? But we're not done! Remember those triangles? Attach the long edge of a triangle to each side of your block...
And, if you're like me, you'll need to make a second one right away just because....
when you lay the triangle face down to sew, the point lines up nicely with the point in the center of your block! Isn't that clever? a happy coincidence..... I love to use binder clips to hold my bigger pieces in place while I stitch.
Once all four triangles are added, your block is complete!
 |
| EPP Kisses block finishes at 6 1/2" |
Kind of fun, huh? I think so too. I can't wait to make a few more and turn them into something useful.
Oh hey, are you on Instagram? so much crazy inspiration there! You can find me here. If you post your EPP Kisses blocks on Instagram, use the hashtag #eppkisses so we can all see them and oooh and ahhhh, ok? Have a happy day!


2 comments:
I am so sorry my eyes were rolling, just as you suspected. But GOOD for you! For paper pieceers, this is awesome and I'm so glad you are combining 2 great ideas. Have fun!
Oh my no wonder you didn't sleep well. that's a lot running around your head. Looks great...
Post a Comment