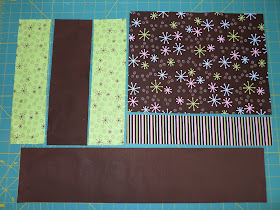
 To make this placemat, you'll need 7 different fabrics from your stash, cut as follows:
focus fabric: piece 1, 9 1/2 x 12 1/2 inches and back piece, 18 x 24 inches
green: pieces 3 & 5, each 3 x 11 inches
brown solid: piece 4, 3 1/2 inches x 11 1/2 inches and piece 6, 4 1/2 x 20 1/2 inches
stripe: piece 2, 2 1/2 x 12 1/2 inches
candle stripe (cut on a diagonal): candle piece, 1 x 5 inches, backed with fusible web
yellow scrap: one flame piece backed with fusible web
pink: letters backed with fusible web (make sure you reverse them!)
a piece of batting 18 x 24 inches
here are the pieces all laid out:
I got the candle & letter templates from free clipart.... just do a google search! Trace them onto the fusible web, iron it onto your fabrics & cut them out. 

Now you need to applique the candle & the letters onto the corresponding solid brown pieces (of course yours can be different colors! I'm just trying to make it easy for you by referring to the colors I used). I love to applique by hand with embroidery floss & a blanket stitch. Feel free to do your on the machine if you wish! 
Now we're going to begin sewing it together. Lay your backing on a flat surface, right side down, & then your batting on top of it. Take piece one & place it right side up in the top right corner. Now lay piece 2 on top of piece one, face down, like this:  Stitch a 1/4 inch seam across the bottom of piece 2. Flip piece 2 down, so it is face up, & press well. Continue to stitch & flip the pieces in numerical order. Here we add piece three....
 and four....
 and so on....
 Until all of the pieces are stitched onto the backing/batting.

Trim the back & batting even with the edges and bind your placemat as desired! No need to quilt, you've already done that with the stitch & flip method.
Stitch a 1/4 inch seam across the bottom of piece 2. Flip piece 2 down, so it is face up, & press well. Continue to stitch & flip the pieces in numerical order. Here we add piece three.... and four....
 and so on....
 Until all of the pieces are stitched onto the backing/batting.
Trim the back & batting even with the edges and bind your placemat as desired! No need to quilt, you've already done that with the stitch & flip method.
I'd love to see your creations if you make one! Please add a picture to the ellyn's place flickr group...
Love it! Would love to make it bigger as a table runner for birthdays too...
ReplyDeletethat is brilliant. My girls are learning to sew, this might me something I could do with them. I love it! If I do, I will post it.
ReplyDeletethanks for your words today on my book post, it really encouraged me, I am not feeling so nervous tonight :)
Shona
Thanks for the tute!! I've posted about it at http://deepashome.blogspot.com/
ReplyDeleteRegards,
Deepa
Hi Ellyn,
ReplyDeleteI know this is a really old post but I just came across the pattern on Pinterest and I'm making it as we speak. I just wanted to let you know there's a small discrepancy in the measurements. I'm sure it's a typo since your pics are perfect, but it may make it challenging for a beginner to sort out! :)
The short green and brown strips do not match, it looks like they should all be the same, whereas you have made the brown strip a 1/2" longer. This becomes a problem as soon as I try to add strip C, the green strips are either a 1/2" too short, or strip B (stripes) is a 1/2" too wide.
I think the remedy is to either make C D E all 11 1/2" long, or make B only 2" wide instead of 2 1/2". Hope that helps anyone else trying to make these! They are super cute!